
EspoCRM offers 60+ customization and configuration options covering both simple admin-level adjustments and code-level changes that allow companies to adapt the system to fit their business processes, security requirements, data structures, integration needs, and user experience preferences.
Almost every CRM on the market describes itself as flexible and customizable. Most of them are, indeed, but there’s a limit to how far that customization goes. You can rename a field, adjust a pipeline stage, maybe even add a custom list view filter. All of that counts as customization, technically. Issues arise when processes don’t fit the default model. Some businesses need record types that don’t exist yet or forms that respond to what’s being entered. And that’s exactly when you find out whether a system is merely configurable or actually customizable.
Customization was our main goal during EspoCRM’s development. That’s why nearly all aspects of the system (how data is structured, how records are displayed, and who can see what) are configurable. Whether you’re planning to customize the system or just want to understand its capabilities, we’ll look at each configuration and customization option and explain how it can be used in practice.
A Detailed Overview of Customization Capabilities in EspoCRM
Section 1. Data Structure & Entity Management
The foundation of any customizable CRM is how well it lets you model your own data. EspoCRM’s Entity Manager is a no-code tool that lets admins reshape the data model through the system UI.
1. Custom Entities
Administration > Entity Manager
CRMs come with a fixed set of entities (Contacts, Accounts, Leads, Opportunities, Cases, etc.), which are universal and match the needs of most companies. Still, your business often tracks information that doesn’t fit any of those categories. Entity Manager lets administrators create new entity types from scratch. A custom entity gets its own database table, views, and default relationships. From the user’s perspective, it works just like any other built-in entity.
Creating a new entity starts with choosing a type: Base, Base Plus, Person, Company, or Event. All entity types have a pre-configured set of default fields and panels. After that, you decide whether records should have Stream (so people can leave notes and track changes) and set the entity’s basic properties: Name, Labels, Icon, and Color.
2. Built-in Entities
Administration > Entity Manager > {Entity Name} > Edit
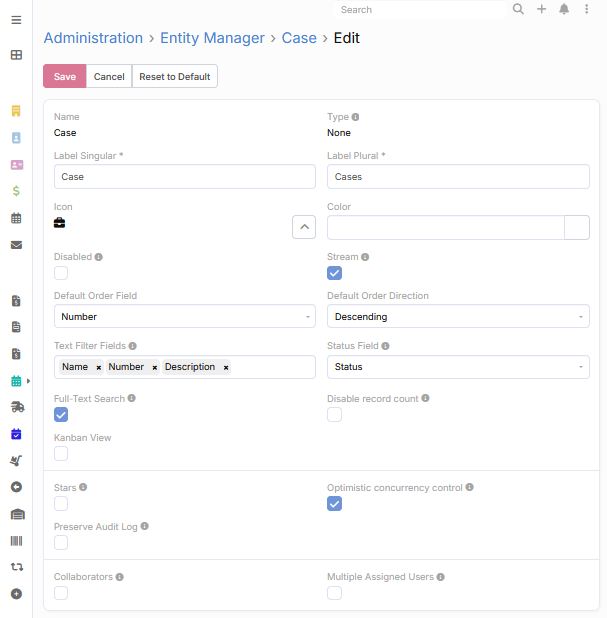
Built-in entities have names, layouts, fields, and relationships that were configured to fit a generic CRM use case. Businesses may eventually want to disable entities they do not use, change their settings to fit their processes or terminology, or even reset those settings to default at some point.
EspoCRM lets you adjust built-in entities without touching code. One of the most common changes is renaming; you can change Singular and Plural Labels for any entity and they will appear across all menus, list and detail views, reports, and relationships.
Beyond that, entities can have Colors and Icons assigned for quicker visual navigation. You can set the Default Order Field and Direction for the list view and define which fields the system checks when users search by text in Text Filter Fields. If your team doesn’t use a particular entity, you can disable it here by ticking Disabled. There are also two checkboxes that control whether Stream (activity feed) and the Stars bookmarking feature are used for that entity; both can be turned off when they’re not needed. And that’s only part of what you can configure.
3. Custom & Built-in Fields
Administration > Entity Manager > {Entity Name} > Fields
Fields are where data is entered and stored. EspoCRM gives you a lot of control over how fields behave, not just what they’re called and what type of information is entered. The system supports 20+ field types for storing different kinds of data, including text, numbers, dates and times, addresses, selection lists, checkboxes, links to other records, files and attachments, and barcodes.
Fields (both custom and built-in) have a set of parameters that vary by field type such as Labels that are displayed in the interface, Required (the record can’t be saved while the field is empty), Read-only (users can’t edit the field in the UI), Read-only After Create (the field is locked once the record is created), a Default value for new records, and Audited (changes to the field are logged in the record’s Stream). There are also many other field-type-specific configuration options.
4. Built-in & Custom Relationships
Administration > Entity Manager > {Entity Name} > Relationships
All CRM data is interconnected, and Relationships are the feature that shows how records from different entities are linked. For instance, reviewing a Contact record reveals the connections between that customer and their related tasks, open deals, and recent cases in its panels. Without the right relationships and layouts, the staff ends up cross-referencing separate pages to find the data they need.
EspoCRM allows you to create and manage relationships between built-in and custom entity types. It supports One-to-Many, Many-to-One, Many-to-Many, One-to-One in both directions, and Children-to-Parent relationships. During setup, you name the link on each side and can enable the Audited option to log the creation, linking, and unlinking of related records in Stream. You can also add its relationship panel to the detail view.
5. Dynamic Logic
Administration > Entity Manager > {Entity Name} > Fields > {Field Name} > Dynamic Logic panel
Most CRM forms are static, so all fields are always visible, editable, and show the same options (if they are enum/multi-enum). That’s fine if every field is needed all the time, but in some processes, that is not the case. Some fields are only relevant in certain situations, while others should be required or optional based on specific conditions.
Dynamic Logic makes forms respond to the data being entered. For any field on any entity, you can create rules that control the field’s behavior based on conditions you define. These rules can make fields visible, required, read-only, invalid, and define which options are available for Enum, Multi-Enum, Array, and Checklist fields when the user fills in the form.
In practice, the feature can be used to make the Competitor field visible only when an Opportunity is marked as Closed Lost or make a Reason field required when a Case Status is set to Rejected. Dynamic Logic updates forms in real time as users fill them out and prevents mistakes that come from static forms.
6. Formula
Administration > Entity Manager > {Entity Name} > Formula
Some business rules can’t be enforced through Dynamic Logic in field settings alone. In these cases, you can use EspoCRM’s formula language to define more complex custom logic.
Formula scripts let you calculate values and assign them to fields, apply conditional logic, call built-in functions, and access attributes from the current record or related records. You can write a Before-Save Custom Script and an API Before-Save Script for each entity type.
The Before-Save Custom Script runs on the server every time a record is saved, before the data is written to the database. The API Before-Save Script runs only when a record is created or updated through an API request, which includes saves from the EspoCRM interface itself but not mass updates or imports. Admins typically use it to reject invalid data with an error message, check for duplicates, or block changes that users aren’t allowed to make.
7. Multiple Pipelines
Administration > Entity Manager > {Entity Name} > Edit > Pipelines
Administration > Pipelines
A single sales pipeline can be limiting for businesses that handle different kinds of sales. For example, standard sales, renewals, and partner deals often follow different stages and therefore require separate pipelines. Pipelines let you set up several distinct pipelines for the same entity type. The feature can be enabled at Administration > Entity Manager > {Entity Name} > Edit > Pipelines for Leads, Opportunities, and custom entities of Base, Base Plus, Company, and Person types. Custom entities must have a Status field specified. It is selected from the available Enum fields at Administration > Entity Manager > {Entity Name} > Edit > Status Field.
After the feature is enabled for an entity, pipelines can be created and managed at Administration > Pipelines. Each pipeline has its own stages that map to values of the Status field. You can create as many pipelines as your sales process requires with their own stage sequences. They can be made available to all users or assigned to specific teams, so different teams can work with different pipelines for the same entity without seeing each other’s stages.
When adding a record to an entity that supports multiple pipelines, users have to select a pipeline in the required Pipeline field. The selected pipeline determines the available stages for the record, but users can reassign the record to a different pipeline if needed. In the Kanban view, the columns correspond to the stages of the currently selected pipeline. To switch to a different pipeline, users can select it from the dropdown.
8. Duplicate Check
Administration > Entity Manager > {Entity Name} > Edit > Duplicate check on update
Duplicate records are a frequent problem for businesses that manage customer data in a CRM. EspoCRM performs a duplicate check when users create new records. If a potential duplicate is detected, the system shows the matching records, and the user can either create the new record anyway or cancel and open the existing one.
EspoCRM can also perform duplicate checks every time a record is updated. It helps detect duplicates that arise when your team changes record information. The feature is configured at Administration > Entity Manager > {Entity Name} > Edit > Duplicate check on update. To determine which fields the system uses for comparison, use the Duplicate check fields setting.
Section 2. Configuring Views & Panels
After you’ve configured your data structure, you can use Layout Manager to determine how that data is presented. The system allows you to configure layouts for different entities, including list views, detail views, side and bottom panels, Kanban views, and more.
9. List & Detail Views
Administration > Layout Manager > {Entity Name} > List / Detail
The two main views for working with records are Detail view, where you view and edit a record, and List view, where multiple records are displayed at once. Both are configured in Layout Manager using a drag-and-drop interface.
In the Detail and Detail (Small) layouts, you arrange fields into panels and rows. Panels can be named, colored (even based on Dynamic Logic conditions), hidden by default, or grouped into tabs. Fields within panels can be arranged in one to four columns per row. If a field needs more space, you can make it span the entire row.
The List layout configuration starts with selecting the columns (fields). You can then set their width and alignment, decide which columns are non-sortable, and choose which field links to the record’s detail view, usually Name.
Administrators can also create Custom List Layouts for specific relationship panels, so each panel can display its own set of columns.
10. Side Panels & Bottom Panels
Administration > Layout Manager > {Entity Name} > Side Panels / Bottom Panels
When users open a record, they usually need more information than just the fields belonging to that entity. They want to see related documents, campaigns, emails, tasks, calls, and other relevant information. Detail views display this related data in two additional areas besides the main form: Side Panels on the right and Bottom Panels below the form.
Side Panels are smaller panels positioned alongside the main form that display supporting information about assigned users, teams, past and current activities, and tasks. These panels can be reordered, colored, and shown or hidden conditionally. The Side Panel Fields layout also lets you choose which fields, such as Assigned User or Teams, appear in the default side panel.
A Bottom Panel is a mini list of related records, e.g., the Contacts linked to an Account or the Documents attached to an Opportunity. You can configure bottom panels just like side panels: select which ones appear, arrange their order, set colors, and add conditions making them visible. It’s also possible to collapse them or group them into tabs to keep the detail view uncluttered.
Lastly, with the Advanced Pack extension, you can add Report Panels as side or bottom panels to display live record-related report results right on a record’s detail view.
11. Search Filters
Administration > Layout Manager > {Entity Name} > Search Filters
Every list view has a search bar at the top. The Search Filters layout controls which fields are available there as filter options. Each built-in entity has its own default filter field list that covers the record details users are most likely to search by, such as Assigned User, Teams, Status, Email, Address, the dates a record was created or modified, and similar fields. Custom entities have no default filter fields; they can be added separately. You can add any existing or custom field that your team uses to search and segment records, and also set the order they appear in.
12. Mass Update
Administration > Layout Manager > {Entity Name} > Mass Update
Mass Update is the action that gives a user the ability to select multiple records through a list view and update specific fields across all of them at once. In this layout, you define the field list that is displayed in the Mass Update Form. Use it only for the fields that need bulk editing to prevent accidental bulk overwrites.
13. Convert Lead
Administration > Layout Manager > Account / Contact / Opportunity > Convert Lead
The Convert Lead layout defines the fields available on the lead conversion form for creating a Contact, Account, and/or Opportunity. It determines what information users can view and enter during conversion. Selecting the appropriate fields ensures that existing Lead data (e.g., Email or Address) is transferred to the corresponding fields in the new records without manual re-entry. Fields that aren’t filled in automatically can be completed manually.
14. Kanban View
Administration > Layout Manager > {Entity Name} > Kanban
Kanban is a card-based view of records organized into columns, where each column represents a value of a specific field, usually a status or stage field. Users can drag cards between columns to update the record’s status or stage without opening it. The view can be enabled for any entity at Administration > Entity Manager > {Entity Name} > Edit > select an Enum type field as Status Field > tick the Kanban View checkbox. In Layout Manager, you choose which fields are displayed in cards, how they are aligned, whether they act as links, and whether they use large font sizes or muted colors.
15. Layout Sets for Teams & Portals
Administration > Layout Sets
By default, all users see the same layouts for a given entity. Layout Sets let you define alternative layouts for selected entity types and assign them to specific users, teams or portals. The underlying records and data model remain the same, but users see different fields, panels, and list columns depending on their layout set. This way, you can adapt views and panels to match what different teams or departments need to work with.
Section 3. User Interface & Branding Customizations
An intuitively organized interface helps users find what they need faster. Companies can configure EspoCRM’s interface elements to reflect their processes and branding.
16. UI Themes
System: Administration > User Interface > General tab > Theme
User: Dropdown menu > Preferences > User Interface
The system doesn’t have to retain its default appearance or look identical for every user. User Interface settings let you change the UI Theme and adjust the Navbar position. Themes change the color palette; light and dark variants are also available. The default theme is set by the system admin, but individual users can override it in their own Preferences unless the admin has disabled this option.
17. Company Logo & Application Name
Administration > User Interface > General tab > Company Logo / Application Name
After installation, the system shows EspoCRM’s default logo at the top of the navigation bar and on the login screen. The admin settings let you upload your own Company Logo and change the Application Name.
18. Navigation Menu
System: Administration > User Interface > Navbar tab
User: Dropdown menu > Preferences > User Interface tab > Custom Tab List
The left-side or top navigation bar displays entity tabs that let users switch between modules. By default, the system displays a set of commonly used entities in the menu, but not all of them are relevant to every team. Admins can configure the Navbar Tab List at the system level: add and remove tabs for unused entities, reorder them so the most-used modules are shown first, group related modules into dropdown menus, and disable and enable tab icons, scope and tab colors. In Preferences, users can customize the navbar by adding their own Custom Tab List.
19. Quick Create List
Administration > User Interface > Navbar tab > Quick Create List
The + button in the top bar is a shortcut for creating records quickly from any page. Quick Create List controls which entities are available in that menu. Out of the box, it includes a predefined set of entities, and administrators can add or remove any of them. The entities available to each user depend on the creation permissions defined in their Roles. If a user cannot create records for a particular entity, it won’t appear in their Quick Create List.
20. Custom Labels & Translations
Administration > Label Manager
Many businesses don’t use standard CRM terminology internally. The same entity can be called Opportunity, Deal, Project, or Quote depending on the industry and team preferences. In EspoCRM’s interface, entity names, field labels, status options, menu items, and other labels can be edited. Label Manager lets admins override any labels to adapt the system’s translations or use custom, business-specific terminology.
21. Dashboard & Dashlets
System: Administration > User Interface > Dashboard tab
Administration > Dashboard Templates
User: Dropdown menu > Preferences > User Interface tab
or Home > Dropdown menu > Edit Dashboard / Add Dashlet
Dashboard is the home page made up of configurable widgets Dashlets. The dashboard’s usefulness depends on its content, which is configurable at both the system and user levels.
Admin-configured dashboards define which dashlets are shown, how they’re arranged, and how many tabs there are on the home page by default. Administrators can manage these settings at Administration > User Interface > Dashboard tab. In addition, Dashboard Templates, available at Administration > Dashboard Templates, can be used to set custom dashboard layouts for teams or for individual users to reflect their roles.
Users can adjust their own dashboard on their home page (Home > Dropdown menu > Edit Dashboard / Add Dashlet) and through Preferences (Dropdown menu > Preferences > User Interface tab). The dashlet library includes Calendar, Stream, Activities (for a combined view of custom events, calls, tasks, and meetings), Records Lists (for a filtered live list of any entity), Reports, an Iframe (for pulling in external tools or pages), Memos (for notes), and others. Each dashlet has its own title and settings for display options and how often it refreshes. Users can also lock their dashboard to preserve its current layout and prevent accidental modifications.
Section 4. Administration & System Configuration
System configuration settings define application-wide behavior and defaults across EspoCRM.
22. Language & Locale Settings
System: Administration > Settings > Locale tab
User: Dropdown menu > Preferences > Locale tab
Language and locale settings ensure that the interface, dates, numbers, and addresses are displayed correctly both for employees working in the same country and for a distributed team spread across multiple regions. The settings are configurable globally and per user. The admin-configured system defaults apply to all users if no user-specific setting is chosen in Preferences. You can specify the default language for all UI labels, the system-wide timezone, date and time formats, the first day of the week, fiscal year start, thousand separator, decimal mark, and address format. Address input gets two additional configuration options: autocomplete lists for cities and states, which speed up data entry.
23. Notification & Reminder Settings
System: Administration > Notifications
User: Dropdown menu > Preferences > Notifications tab
Notification settings that aren’t customized create so much noise that people either start ignoring alerts or fail to flag important assignments and they get missed.
From the admin side, you decide which entities generate in-app notifications when a record is assigned and can also turn on a notification counter in the page title. Email notifications for Stream are controlled separately and allow you to set which entities send them, which event types are included (mentions in posts, status changes, received emails), whether they go to internal users, whether they go to portal users, and whether there’s a delay before sending them, allowing you to review and edit the message if needed.
On the user side, each person manages notifications in Preferences. Email notifications about Stream posts, mentions in posts, and status updates can be turned off. Users can choose which assignment types (Meetings, Calls, Tasks, Emails, Process User Tasks) generate in-app notifications and whether they receive in-app notifications about reactions, including the option to be notified about reactions for non-followed records. It’s possible to group related notifications and enable notification sounds to stay informed about new activity and review related updates together.
24. B2B & B2C Settings
Administration > Settings > General tab > B2C Mode
The default data model is built around a B2B approach, where businesses sell products or services to other businesses. Contact records are linked to Accounts, so all activities and emails related to those Contacts are associated with their Account automatically. It allows you to open an Account record and view the full history of interactions with all Contacts who work for that company.
The B2C Mode setting adjusts EspoCRM for businesses selling to individual customers. The Contact (customer) record holds their complete interaction history (emails, calls, meetings, and tasks). Lead conversion no longer offers the option to create an Account. Once admins remove the Account tab from the navigation menu, delete Account fields from layouts, and disable Account access in Roles, the system becomes focused entirely on individual customers.
25. Stream Settings
Administration > Settings > General tab > Stream Section
Stream is the activity feed attached to each record that tracks user posts, record updates, emails, logged calls, tasks, and meetings. To track changes to specific fields or relationships in Stream, you can enable the Audited checkbox at Administration > Entity Manager > {Entity Name} > Fields/Relationships > {Field/Relationship Name} > Audited.
Stream settings let you configure Reactions available to users and email body visibility in Stream notes. Reactions are the response options available on Stream posts; the default is Like, but the list can be extended. For email body visibility, admins choose which entity types show the full email body inline when an email is logged to a record. If you manage customer service requests through the CRM, seeing the complete email thread in a Case’s Stream record without opening a separate view is useful.
26. Follow Settings
Dropdown menu > Preferences > General tab
Following a record in EspoCRM means receiving Stream notifications for posts, status changes, emails, and other updates associated with it. Manually following every relevant record is time-consuming. Follow settings in Preferences give each user control over which records they follow automatically.
The settings go from specific to broad:
- Auto-follow after posting in Stream: if you’ve engaged with a certain record, you may want to know what happens next.
- Auto-follow when added as a collaborator: when a team member adds you to a record, you are automatically subscribed to all of its Stream updates.
- Auto-follow created records of specific entity types: for example, you might want to auto-follow all Cases you created, even if they are assigned to other users.
- Auto-follow created records: records you create automatically put you on the follower list.
- Global Auto-Follow: subscribes the user to all records of selected entity types, not just the ones they created or were added to, but all of them. The setting is best used for managers or team leads who need visibility across all records of the entity.
27. Currency Settings
System: Administration > Currency
User: Dropdown menu > Preferences > Locale tab
EspoCRM supports multiple currencies across the system. The Default Currency is automatically preselected when creating new records, while the Base Currency is used to calculate exchange rates for other currencies. Both settings can use the same currency or different currencies.
Additional currencies can be added to the Currency List with their own exchange rates relative to the Base Currency; those rates can be updated as they change. In Preferences, each user can choose a personal Default Currency that will be preselected for new records.
28. Working Time Calendar
Administration > Working Time Calendars
When different users or teams work different hours, Working Time Calendars define when each of them is available. They let you specify a weekly schedule with working hours set per weekday, add exceptions for days with adjusted hours, and mark holidays and leave days. A Working Time Calendar can be assigned at the system level as the default or assigned to a specific team or user to reflect the cases when different parts of a business operate on different schedules.
Section 5. Access Control, Security & Identity
Different positions in a company have different responsibilities, and system access should match them. Next, we’ll describe how to manage employee accounts and teams, assign roles, and restrict access to sensitive business information.
29. Users
Administration > Users
Every person who uses the CRM needs a user account with access permissions and interface settings appropriate to their responsibilities. There are two types of internal users: Regular (who work within configured access controls) and Admin (who have unrestricted access to all records, settings, and features). It’s best to grant admin access only to users who need to manage the entire system.
User accounts store employees’ contact details: User Name, Type, Title, Email, Phone Number, and an Is Active checkbox that controls whether the user can log in. Unchecking it disables access without deleting the user account. More important configurations are related to which Teams the user belongs to, which Roles are assigned to them, and what their Default Team is.
When creating a user account, you can send an email with access info. Leaving the password empty lets the user set their own, which is more secure than sending a password by email.
30. Teams
Administration > Teams
Teams help you organize your employees and manage access to different records. They can be based on departments, regions, product lines, or any other grouping that works for your business. Every Team record consists of a group of users, where every member can have a designated position, such as Salesperson or Manager. It defines default Roles, Position List, Layout Set, and Working Time Calendar. The team’s Layout Set and Working Time Calendar apply to new users who have that team selected as their Default Team.
31. Roles
Administration > Roles
Roles control access at three levels: which records a user can interact with, which fields they can see and edit, and what system-wide actions they can perform.
Scope Level permissions define access to each entity. For every entity, you can allow or deny record creation and set an access level (all records, team records, own records, or none) for reading, editing, deleting, and viewing the Stream.
Field Level security provides the ability to configure permissions for specific fields. For any field on any entity, a Role can restrict Read access, Edit access, or both. When a user holds multiple Roles, field permissions merge using the most permissive setting across all applicable Roles. Still, field-level restrictions are not automatically lifted by another role that has no permissions configured for the same field. If one Role restricts field editing and another Role does not define any permissions for that field, the restriction remains in effect.
Permissions control whether users can assign records to other users, access group email accounts, export data, run mass updates, erase personal data, manage followers on records, send Stream messages to other users, and view the audit log.
32. Record Locking
Administration > Entity Manager > {Entity Name} > Edit > Lockable
Record Locking prevents users from making unintended changes or removing certain records. It is useful for protecting records that are considered final, such as closed won opportunities, closed cases, or other records, where accidental edits or removals usually cause problems.
The feature can be enabled for most built-in and custom entity types at Administration > Entity Manager > {Entity Name} > Edit > check the Lockable setting. By default, locking applies to all fields on the record. If there are specific fields that should remain editable even when a record is locked, admins can mark those fields as Not Lockable in the field settings at Administration > Entity Manager > {Entity Name} > Fields > {Field Name} > Not Lockable.
Records can be locked or unlocked from the dropdown menu in their detail view or in bulk from the list view using the Lock and Unlock options in the Actions menu. A locked record can’t be edited or removed until someone with the Lock Permission unlocks it. Admins can manage this permission through roles and restrict access to specific users.
33. Data Privacy & Personal Data
Administration > Entity Manager > {Entity Name} > Fields > {Field Name} > Is Personal Data
If your business is subject to data privacy regulations, such as the CCPA or GDPR, or simply needs a way to handle personal data erasure requests, EspoCRM has built-in tools for this. Admins can specify which fields contain personal data at Administration > Entity Manager > {Entity Name} > Fields > {Field Name} > Is Personal Data. By default, Name, Email, Phone, and Address are marked for Contacts and Leads, while Email is marked for Accounts. You can extend this list with other fields in these entities or mark personal data fields in custom entities of the Person type to match the personal information your business stores.
When a request comes in to view or erase someone’s personal data, users with the Data Privacy permission can open the relevant record, click View Personal Data in the dropdown menu next to the Edit button, and see all fields marked as personal data. There, individual field values can be erased if the user has edit access to the record.
34. Two-Factor Authentication
System: Administration > Authentication > 2-Factor Authentication
User: User Account > Security > Enable 2-Factor Authentication
Two-factor authentication adds one more verification step to the login process. The first step for users is providing the usual username and password. The second is a code that is generated by an authenticator app or delivered by email or SMS (requires a configured provider). Admins have to enable the feature globally and select allowed methods for regular and/or portal users, and after that users enable it for their own accounts. For app-based verification, employees can use Google Authenticator, Microsoft Authenticator, or any similar authentication app.
35. LDAP Authentication
Administration > Authentication > Authentication Method: LDAP > LDAP tab
LDAP authentication is for deployments where user identity is managed centrally in a corporate directory. Users authenticate directly against the corporate directory service (like Active Directory or OpenLDAP), so no separate EspoCRM credentials are needed.
Alongside authentication, the feature also allows the creation of new user accounts. When the Create User in EspoCRM setting is enabled, the system creates a new user record on the user’s first login and fills in their user fields (e.g., First Name, Last Name, Title, and Email Address) from directory attributes automatically. The new user can also be assigned to the predefined User Teams selected in the EspoCRM settings.
36. OpenID Connect
Administration > Authentication > Authentication Method: OIDC > OIDC tab
OpenID Connect is for companies that manage user identity centrally through an OIDC identity provider and want CRM authentication to go through it. After configuring your provider’s details and credentials, users can authenticate through Okta, Microsoft Entra ID, Auth0, or your preferred system without a separate EspoCRM password. It can also automate new user account creation, so the first time a user logs in via SSO, the system creates their account using the data from the identity provider.
37. Password Policies
Administration > Authentication > Passwords tab
Password settings are divided into Strength requirements and Recovery behavior. The Strength section is about what passwords are allowed to look like. You set the length for system-generated passwords, the minimum length for user passwords, the minimum number of letters and digits, and whether mixed case is required.
In the Recovery section, admin users define how and whether password resets work. Password recovery can be disabled system-wide or specifically for admins or all internal users. A separate setting ensures that the password recovery form does not indicate whether a user account with a specified email address exists in the system. It prevents exposing account information via the recovery form to unauthorized users who try to find valid accounts.
Section 6. Email, Templates & Communication
When communication happens directly in EspoCRM, staying in touch with leads and customers takes less effort as you do not have to juggle multiple apps to answer an email. The system offers various tools for managing email communication and automating routine messaging tasks.
38. Email Account Configuration
User: Emails > Dropdown menu > Personal Email Accounts
Team: Administration > Group Email Accounts
System: Administration > Outbound Emails
There are two types of email accounts in EspoCRM: Group Email Accounts and Personal Email Accounts. For system-generated emails, you can set the System Email Address in Administration > Outbound Emails.
Personal Email Accounts are configured per user and connect an individual’s mailbox to the CRM. IMAP fetches their incoming emails, SMTP lets them send from the system’s interface using their own address. The monitored folders, fetch-since date, and destination folder for incoming emails are all configurable.
Group Email Accounts are shared mailboxes for support, sales, or marketing. They are also configured with IMAP for receiving and SMTP for sending messages. Incoming emails are fetched automatically and linked to related Contacts, Accounts, Cases, and Leads based on the email address.
Outbound Emails define the address the CRM uses for all automated notifications, password resets, workflow-triggered messages, and any other system-generated communication. One Group Email Account is designated as the system default, and its address is set for outbound emails.
39. Email Templates
Administration > Email Templates
Email Templates are reusable, pre-written emails that can be selected when composing an email manually, used in workflow and BPM automation, or sent as a part of mass email campaigns. Templates can be written in plain text or HTML, include attachments, and be organized into categories.
The subject line and body both accept placeholders, which are standard field names wrapped in curly braces (like {Person.name}) that pull in CRM data upon sending. The editor has a panel that lists every available placeholder for the entity to prevent mistakes. The system also includes native support for opt-out links to add unsubscribe options to your messages.
40. Email Filters
System: Administration > Email Filters
User: Emails > Dropdown menu > Filters
When too many messages pile up in one inbox, you need a way to sort them to keep your inbox organized and easy to navigate. Email Filters can automate that.
Admins can set system-wide filters by ticking the Is Global checkbox to ignore unwanted emails across all email accounts, which can help block spam. Users can create filters for their entire inbox or their Personal Email Accounts, with options to ignore messages, move them to folders, mark them as read, or skip notifications. It’s also possible to configure Group Email Account filters to ignore unwanted emails or put certain messages into a group folder, which keeps a shared mailbox organized. Each of these filters specifies to/from email addresses, what words or phrases the subject and body contain, and an action to take: ignore the email or put it in a specific folder (where available).
41. Email Folders
User: Emails > Dropdown menu > Folders
Team: Administration > Group Email Folders
Email Filters do the sorting automatically, and Email Folders are where sorted emails are stored. Personal folders are created and managed by users for their own inbox. They are visible only to them and can be organized however they like. Group email folders are created by admins for specified teams. Incoming emails received through a Group Email Account can be directed to a group email folder automatically by filters, which helps support teams keep their shared inbox organized by category.
42. PDF Templates
Administration > PDF Templates
PDF Templates are used to generate printable documents from record data for quotes, invoices, proposals, service reports, meeting summaries, or any other document a business needs to produce from CRM records. A template is built in the visual HTML editor using placeholders. When a template for an entity exists, users generate a PDF for one or more records using the Print to PDF action. The generated files can be downloaded or sent as email attachments.
43. Template Manager
Administration > Template Manager
System emails come with standard content that may not fit every organization’s tone, language, or branding. Template Manager allows admins to edit or rewrite the subject and body of assignment notifications, meeting invitations and reminders, call reminders, and password reset emails. These messages can be edited and branded by adding company logos, a personal greeting, or specific field values. The editing process is the same as for email or PDF templates, so placeholders and formatting tools are available.
Section 7. Automation
The system offers two different automation engines, Workflows and BPM, which are available in Advanced Pack, along with a formula scripting layer (see Section 1) for custom logic. These tools can automate tasks, notifications, record updates, approvals, and business processes across the CRM.
44. Workflows
Administration > Workflows
Many actions performed with CRM records are repetitive and based on predefined rules. A common example is case assignment: when a new case is created, it must be assigned to the right team. Workflows can automate actions like this.
Workflows are automation rules that start with Triggers and run specified Actions if the Conditions are met. Workflows can be triggered in several ways: after a record is created, after a record is updated, after a record is created or updated, on a schedule, manually by a user, when called by another workflow rule (Sequential), or when a specified object signal is broadcast in the system (Signal).
Conditions narrow the trigger down and specify when the actions should run. They’re set using a point-and-click condition builder or written as a formula for more complex logic.
Actions are what happens when the rule is triggered and conditions are met, such as sending an email using a template, creating a record, creating a related record, updating the target record, updating related records, applying an assignment rule, executing a formula script, sending an HTTP request to an external system, triggering another workflow, or starting a BPM process.
45. Business Process Management
Administration > Flowcharts / Processes
Workflow rules are great for single-event automation. But when a process involves multiple steps, several people, different possible outcomes, and delays between actions, BPM provides the structure and tools needed to automate it. The feature is based on the BPMN 2.0 standard. Admins design a process as a diagram in the Flowcharts section, and every time the process is triggered, a new Process record is created that moves through the flowchart and can be monitored in real time.
The flowchart is built using three types of elements:
- Events mark where the process starts, where it waits until something happens, and where it ends.
- Gateways are the decision points: exclusive gateways route to one path; inclusive gateways evaluate all outgoing paths and let one or more of them run; parallel gateways run multiple paths at once and wait for all of them to finish; event-based gateways hold the flow until a specific signal arrives or a timer fires.
- Activities are the operational steps: updating records, sending emails, running formula scripts, calling external APIs, and creating User Tasks.
Section 8. Reports & Analytics
Reports provide managers and users with a way to measure progress, track performance, and spot business trends. Next, we’ll cover how to set up different report types in EspoCRM.
46. List Reports
Reports > + Create Report > List Report
List Reports generate a table of records that match a defined set of filter conditions. They look like a filtered, configured version of a list view: rows are individual records and columns are fields you’ve selected. The difference from a standard list view is that a report is a saved, shareable configuration that can be run on demand, sent by email on a schedule, used as a dashlet, as a filter in list views, or to populate Target Lists for Email Campaigns.
While creating a List Report, you choose which columns appear, set their widths and alignment, mark which column links to the record, and configure sorting. Filters narrow down which records are included. Some filters are fixed and always apply, others can be Runtime Filters that users can adjust when running the report. The list report can also be downloaded in CSV or XLSX format or printed as a PDF document.
47. Grid Reports
Reports > + Create Report > Grid Report
When you need totals, averages, or counts broken down by group, you create a Grid Report. It groups records by one or two fields and applies aggregation functions to produce summary figures for each group. To build one, you have to select one or two fields to group by, such as a salesperson, region, status, or a date field grouped by day, week, month, quarter, or year, and then apply aggregate functions: COUNT, SUM, MIN, MAX, or AVG. Filters and Runtime Filters work the same way as in List Reports. Results can be visualized as a chart, exported as CSV or XLSX files, or saved as a PDF using Print to PDF.
48. Joint Grid Reports
Reports > Dropdown menu > Create Joint Grid Report
A Joint Grid Report combines several existing Grid Reports into a single report. It can bring together results from different entity types in a single report, using a common grouping such as month. For instance, a monthly management report might show leads generated, opportunities created and won, and revenue in a single table where each row is a month.
49. Internal Reports
Reports > Dropdown menu > Create Internal Report
Internal Reports are a separate category from the List, Grid, and Joint Grid reports built through the report builder. These pre-built reports use their own calculation logic and require both Sales Pack and Advanced Pack. They cover sales and purchase metrics: Customer Balances, Customer Aging, Supplier Balances, Sales Tax Summary, Purchase Tax Summary, Sales List by Tax Code, Sales Revenue, Sales by Customer, Sales by Product, Sales by Product Category, Purchase Expenditure, Purchases by Product, and Ledger Summary. Once saved, they appear alongside regular reports and can be shared with specific teams.
50. Scheduled Report Sending
Reports > Edit / Create View of a certain report > Email Sending panel
Reports like a weekly pipeline summary or a monthly revenue breakdown are regularly shared with managers, clients, and team members. Email Sending lets you automatically send report results to the specified internal or portal users on a recurring schedule. The setting is on the report record itself, you only have to specify the recipients and the schedule, and the system sends the report results by email at the configured time.
51. Populating Target Lists with Reports
Target Lists > {Target List Name} > Sync with Reports panel
Syncing Target Lists with Reports connects a List Report to a Target List used in email campaigns. The system automatically adds records that match the report’s criteria to the Target List. An optional Unlink setting removes records from the Target List when they no longer match the report’s criteria. This keeps the list up-to-date, which is useful for campaigns where the audience changes over time.
52. Report Panels
Administration > Report Panels
Report Panels embed report results directly into a record’s detail view, as either a side or bottom panel. An admin creates the panel, selects which entity the panel appears on, picks the report to display, and chooses the position. The report panel displays results related to the record being viewed and works with both Grid and List reports.
53. Report Filters
Administration > Report Filters
Report Filters turn complex report criteria into a one-click filter in an entity’s list view. For example, users can remain in the Contacts list view, select a custom report filter from the filter dropdown, and view the contacts with no activity in the past 90 days. You can also restrict report filter access to specific teams.
Section 9. Customer Portals
Customer portal features provide a customizable interface for clients, vendors, partners, or other external users with controlled access to CRM data.
54. Portal
Administration > Portals
Portal is a separate interface that allows external users to securely perform specific actions and access specific data in your CRM. Portals are set up by administrators and accessed via their own URL. Each portal can have its own users, access roles, dashboard, tab list, branding, theme, locale settings, and layout set. For example, you can run one portal for customers and another for partners, each configured for its audience.
55. Portal Role
Administration > Portal Roles
Portal Roles define what external users can do. The structure is the same as internal roles, but with access scopes that reflect an external user’s perspective. A portal user can be limited to their own records, to records linked to their Account, or to records linked to their Contact. Roles can be applied at the portal level (affecting all users of that portal) or at the individual portal user level to grant additional permissions.
56. Portal User
Administration > Portal Users
A Portal User is a login account for an external user. It can be linked to a Contact and one or more Accounts. These links determine which records portal users can access when the contact or account access level is set in their Portal Roles. Portal users log in with their own credentials and see only what their Portal Roles permit.
Section 10. API & Integrations
API capabilities allow EspoCRM to connect with external applications to support automation, synchronization, reporting, and communication across multiple systems.
57. API Users
Administration > API Users
For safer integrations, it’s best practice to create dedicated API Users and assign them custom Roles with controlled permissions. This limits the integration’s access to only the specific data and actions necessary for its operation. If the integration is compromised, you can easily revoke or replace that one API User account. EspoCRM supports two authentication methods for API Users: API Key for simpler setups and HMAC for stronger security.
58. Lead Capture (Web-2-Lead)
Administration > Lead Capture
The feature creates web forms for capturing information about website visitors and saves that information as new leads in the CRM. Lead Capture records generate a specific entry point URL that a website form can POST to and, optionally, an embeddable web form. The form can be displayed on a standalone page or embedded in an iframe on allowed websites. The fields that get populated on the new lead record are defined in Payload Fields. Double opt-in can be turned on to send a confirmation email to the person who submitted the form. The lead record is created after the person confirms, but if the Create Lead before confirmation setting is enabled, the lead is created as soon as the form is submitted. New leads coming through the capture point can be automatically assigned to a team, linked to a campaign or added to a target list for further interactions, and processed by a workflow or BPM process.
59. Custom API Integrations
Custom API integrations are built using EspoCRM’s REST API. The software supports API endpoints for built-in and custom entities. Developers can build integrations that read, create, update, and delete records using standard HTTP methods and authenticate via API keys, HMAC, or user authentication tokens.
60. Webhooks
Administration > Webhooks
External applications can subscribe to EspoCRM events using Webhooks. You set up a webhook with an event type (record created, updated, a specific field changed, or deleted) and a destination URL. Every time that event occurs on the relevant entity, the CRM sends a POST request with the record data to the configured URL. Requests are queued and processed by a scheduled job with automatic retry on failure.
61. MCP Extension
Administration > Extensions
Administration > MCP Endpoints
MCP extension turns EspoCRM into a Model Context Protocol (MCP) server which lets AI agents access CRM data and perform operations. It installs as a standard EspoCRM extension and allows admins to create MCP endpoints that AI clients can connect to. Each endpoint functions as a separate MCP server with its own configuration: the operations available (including finding, reading, creating, updating, and deleting records, as well as searching in a record’s Stream or posting to it), the data and fields exposed, and the users permitted to connect. Access permissions work the same way as elsewhere in EspoCRM; a user’s role determines what they can do through the MCP client. If a user can’t edit Opportunities in the CRM, they can’t edit them through an AI agent either.
Section 11. Developer-Level Customizations
As you can see, admins can configure many aspects of EspoCRM without coding. But when a business needs an integration with another system, a custom view, or a feature that doesn’t exist yet, developers can extend the system with custom code.
62. Custom Extensions
Administration > Extensions
Custom extensions are installable packages that bundle any combination of customizations into a single zip archive. They can be created for individual businesses or offered as vertical industry solutions or third-party integrations. You can install extensions at Administration > Extensions by uploading the file. Installed extensions can also be uninstalled from this page.
63. Custom API Endpoints
Custom API endpoints let developers add new API routes with custom logic. You define the route in a routes.json file and create a PHP action class that handles the request and returns data in whatever format the client application needs. By default, custom endpoints use EspoCRM’s standard API authentication, but they can also be configured to allow unauthenticated requests.
64. Front-End Customizations
Front-end customizations let developers change what users see and interact with at the view level. Most standard screens, panels, and buttons can be replaced or extended with custom views. A developer can change how a field renders, add a button to a detail view that triggers custom logic, build a new dashlet type, create a new field type with its own input and display behavior, or add a panel to a record view with completely custom content.
65. Custom Formula Functions
Custom formula functions extend EspoCRM’s formula language, which is used in before-save scripts, workflows, and BPM processes. When a business needs a function that isn’t built in, a developer can create a PHP class with the function’s logic and register it in metadata. The new function can then be called from any formula script in the system.
66. Custom Scheduled Jobs
Administration > Scheduled Jobs
Custom scheduled jobs extend EspoCRM’s built-in job scheduler with developer-written PHP logic. A developer implements the job in a PHP class and registers it in metadata. An administrator then creates a Scheduled Job record, sets the schedule, and activates it. Custom jobs use the same scheduling system as built-in jobs and can also be run manually through the command line.