The software you use for your business should be all about simplicity of use and user-friendliness. Everyone will agree that the more thought-through the interface of the software is, the easier it is to find needed data and the more productive you become during the workday. However, it often happens that some out-of-the-box elements of the views are either simply unused or worse become a hindrance for users rather than help. That’s the reason why a lot of companies are seeking ways to adjust the view layouts (by adding or hiding fields or subpanels, rearranging their order, etc.) and make the software handier for their employees. In this article, we’ll take a closer look at how to start customizing the views in your instance by changing the display of the subpanels.
What are subpanels?
Subpanels are the tools that show the information from the other entities that is related to a certain record. For instance, in the typical contact record, you can find the documents, cases, target lists, opportunities, activities (calls, meetings, tasks), etc. that are connected to this contact one way or another. Subpanels create a holistic view of the customer record and eliminate the need to toggle between tabs.
In EspoCRM, there are two types of subpanels: side panels and bottom panels. Side panels are located on the right side of the view and include Activities, History and Tasks by default, but you also add panels with reports to display some analytical data. Bottom panels are positioned at the bottom of the detail view. By default, they include Stream and relationship panels (the panels that display related records from the other entities), but you can also add report panels* here.
*Report panels display the report results and can be added to the detail view. To create a report panel, go to Administration > Report panels and then add the panel to the needed entity in Layout Manager > Side Panels/Bottom panels.
How to customize the display of subpanels?
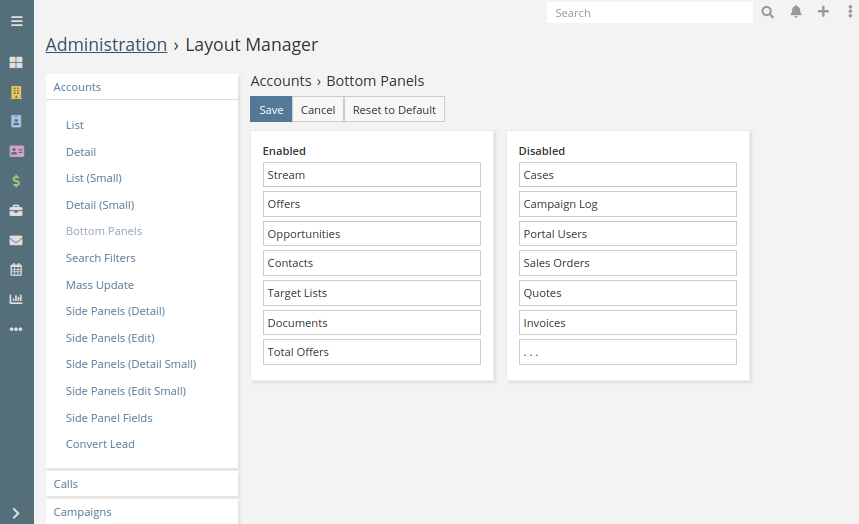
Of course, different types of records (entities) usually require the display of different sets of subpanels in a different order. EspoCRM provides a lot of options to customize the display of subpanels according to your preferences and business needs. To start changing the display of the panels, you should navigate to Administration > Layout Manager > choose the desired type of entity > select the type of subpanel you want to edit.

- Adding or removing panels. After having chosen the type of subpanel you’d like to edit, you will see two columns: Enabled (the panels that are displayed) and Disabled (the panels that are not displayed). You can add or remove a panel from the view by dragging & dropping it from one column to the other and clicking Save.
- Rearranging the order of the panels. To change the order of the displayed panels, just drag & drop the needed panel in the Enabled section to the position you like.
- Hiding panels. Sometimes it happens that the number of panels you need is big and consequently the view gets very cluttered. In this case, you can temporarily hide some panels from the view if they are not used for everyday work. To hide some panels, you should drag & drop the panel with three dots from the Disabled section and place it before the panels you’d like to hide in the Enabled section. To see the hidden panels in the detail record view, the user will need to click on three dots that will appear after not hidden panels.
- Changing colors of the panels. To change the color of a panel, hover the mouse over the right corner of the desired panel and click the pencil icon that will appear. In the next window, choose the color in Style dropdown > click Apply. The available options are Success, Danger, Warning, Info, Primary, Default – no color.
- Making panels stick to each other. The panels may be displayed separately from each other (it means that there is a small gap between them) or they may be stuck together, so there’s no gap between them. If you want to make some panels stuck together, hover the mouse over the right corner of the desired panel and click the pencil icon that will appear. In the next window, check the Sticked box and click Apply.
- Restricting panel visibility. If you want to specify the conditions for making the panel visible, hover the mouse over the right corner of the desired panel and click the pencil icon that will appear. In the next window, click Edit in the Conditions making panel visible section > add the dynamic logic conditions > click Apply.
Please note that after making all the changes to the display of the panels, you should click Save.
Interested in making your business more efficient? Let’s do it together with EspoCRM!
