User Interface
An entity is a place where data is stored in the CRM system. Entities can be used to collect different types of data, e.g. information about the companies you deal with is stored under Accounts, your current customer data are in Contacts and the info about potential ones – in Leads. The navigator bar consists of the list of entities the user has access to. If any functions, buttons, entities or tabs do not work or are missing, then a user doesn’t have access to perform the required action.
All the interface elements analyzed in the example (pic. 1.) are available in any CRM module, only the contents of the view are changed (item 10, pic. 1.).
Homepage
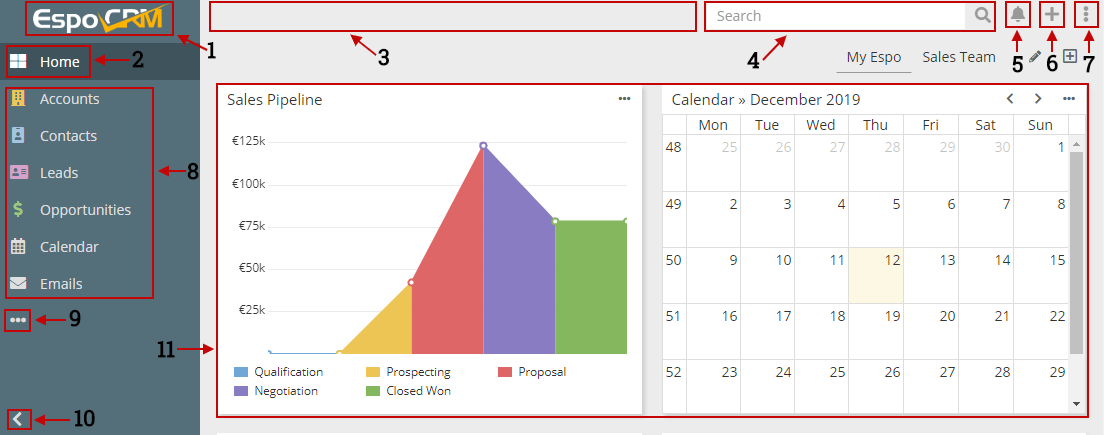
The homepage contains the following elements:
pic. 1
- Logo – displays the homepage upon clicking.
- Home – shows homepage after clicking.
- Status bar – displays the current state of the CRM (loading, errors, etc.)
- Global search – looks for a specified character, substring (word) or string (word combination) in all entity types.
- Notifications – display the information about changes in followed records, emails, posts in the activity stream, etc.
- Quick create – allows straightaway creating of certain entity types (the list of available entity types is displayed upon clicking).
- User menu – displays a list of the following actions:
- Current user – represents the account of logged in user with general information about his/her activities, access rights, etc.
- Administration – is available only for admin users and allows carrying out the sophisticated configuration of the system.
- Preferences – allow to configure the current user’s date and time settings, user interface and notifications.
- Last Viewed – shows the history of last viewed entities.
- About – contains the information about the version, license, copyright of this CRM instance.
- Log Out – logging out of the account.
- Navigation bar – allows to go to the selected entity type.
- Hidden/extended navigation bar – allows to choose from the entities that are not included in the Navigation bar.
- Collapse the navigation bar – reduces the size of the navigation bar.
- View – in this area, all the actions with entities are performed.
List View of an entity
Let’s take a closer look at the list view of the entity using Accounts as an example. The list view can be conditionally divided into two sections: the top (pic.2) and the bottom (pic. 3). The top section of the list view (pic.2) contains:
pic. 2
- Name of an entity – displays the name of the selected entity type.
- Filter – allows to save or apply the created filter. After clicking a user can see the list of available filters. “All” filter is set by default and displays all the records of the entity.
- Search panel – searches for the needed entity record by characters, words or strings according to the set filters.
- Reset – resets the unsaved filters, but filters that were set with the help of “Filter” menu will remain to be applied.
- Add field – adds a field on the basis of which the records of the entity will be filtered.
- Create Entity – creates the record of the selected entity type.
- Filter field.
- Value of the filter field.
- Area of the set filters.
The bottom section of the list view (pic.3) contains:
pic. 3
- Actions – represents the list of available actions for the selected entities. To make the button active, one has to select the record. The following actions are available by default:
- Remove – deletes the selected records.
- Merge – merges several records (not more than 4) into a single record.
- Mass Update – changes the value of the specific field for the selected records (the field can be selected after clicking).
- Export – export the selected record data in CSV or XLS format.
- Follow – the information about the changes to the selected records will be displayed in Stream.
- Unfollow – cancels following the selected records.
- Select All Results checkbox – allows to select all the records of the selected entity type.
- Column Names – allow to order the entity records according to the specified parameter in ascending order (down arrow next to the column name) or descending (up arrow next to the column name).
- Checkbox – allows to select specific records.
- List – displays brief information about the record and allows a user to navigate to a certain record.
Detail View
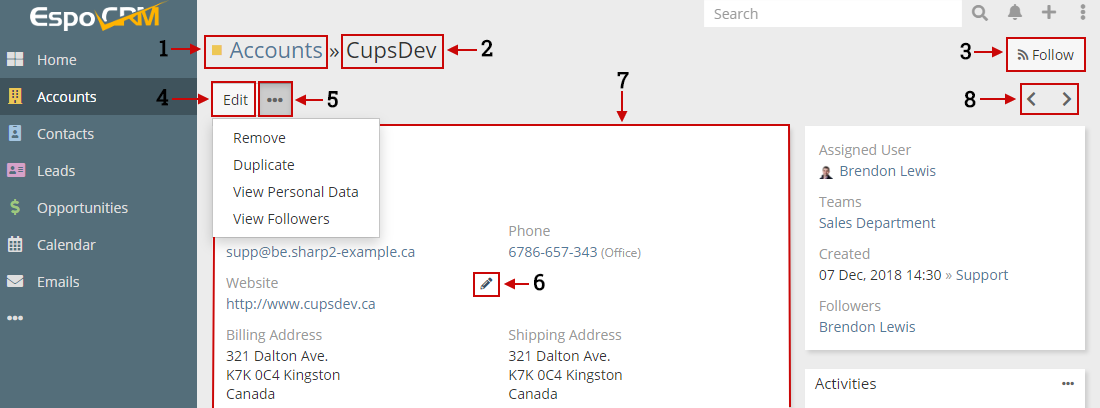
Let’s take a closer look at the detail view of the particular using Accounts as an example. The detail view can be conditionally divided into two sections: the top (pic.4) and the bottom (pic 5). The top section of the list view (pic.4) contains:
pic. 4
- Name of the entity – displays the name of the selected entity type.
- Name – displays the name of the selected record.
- Follow/Unfollow.
- Edit – allows to edit all fields of the record.
- The list of actions available for the current record:
- Remove – deletes the record.
- Duplicate – creates a copy of the record.
- View Personal Data – allows to view and erase personal data of the record.
- View Followers – displays the list of people that follow the record.
- Edit field – is displayed when the mouse pointer hovers the field and allows to edit the selected field. After changing the field value, click “Update” to save the changes.
- The fields of the entity record.
- Arrow buttons – allow to go to the next or previous record.
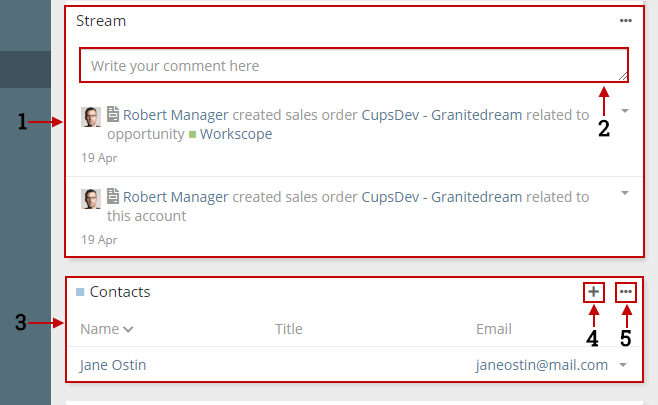
The bottom section of the list view (pic.5) contains:
pic. 5
- Stream – displays a feed where you can see the updates to the record.
- Post field – you can add your comments there.
- Relationships panel – displays relationships with other entities.
- Create a related entity.
- Select an entity record – allows to create a relationship with the existing entity record.